Wednesday, March 31, 2010
Tuesday, March 30, 2010
Easy cross processing tutorial in Photoshop
-
Easy cross processing tutorial in Photoshop
Posted: Mon, 29 Mar 2010 16:27:31 +0000
You’ve taken a photo where the colors looked great in real life, but look pretty dull and average on your computer screen. Now, before you crank up the saturation and brightness levels, maybe you’d like to consider applying a cross processing effect to it. It gives your photo a unique vibrancy and makes any uninteresting subject look pretty neat.
From this: To this:
All you need is five minutes in Photoshop
Begin by selecting a mediocre photo, preferably one you’ve taken during the day and has good contrasts. I find images that include the hues blue and/or green to have the most dramatic effect.
In Photoshop, I’ve opened a photo from my San Onofres trip. As you can see from above, there’s nothing fancy and the colors seem a bit washed out.
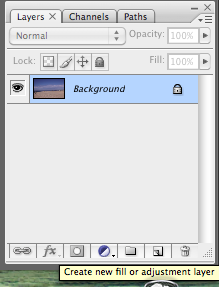
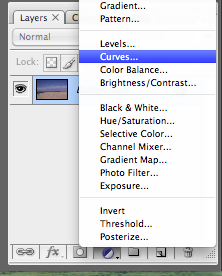
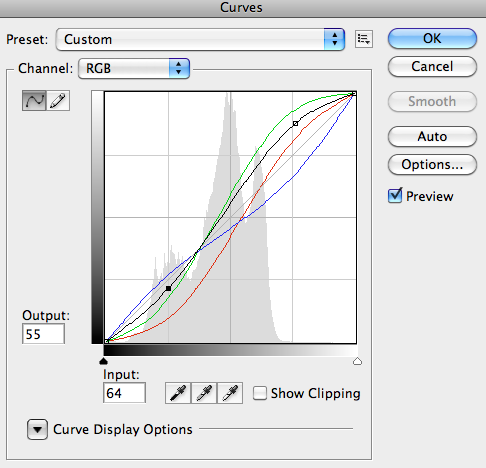
You can go straight to Curves and begin making changes, or a wiser decision would be to create a Curves layer. That way you can continuously make changes or quickly undo the effect by simply deleting or hiding the layer.
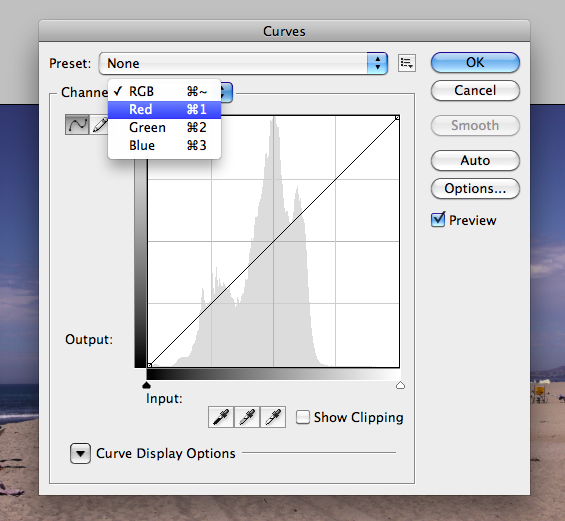
In Curves, we want to firstly adjust the red, green and blue channels individually. To select the single channels, click on the drop down menu that says RGB.
Think Curves, think Strawberry…
With the red and green channels, we want to increase the highlights and decrease the shadows (like an S-curve).
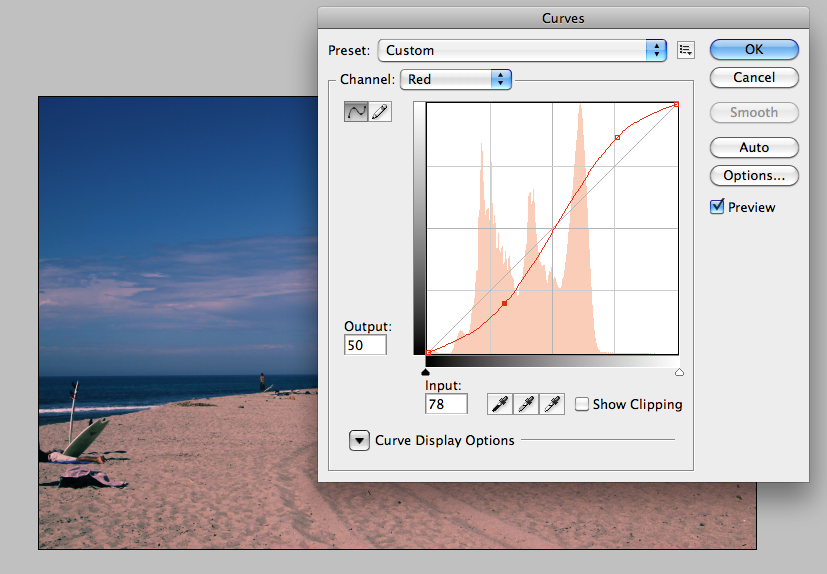
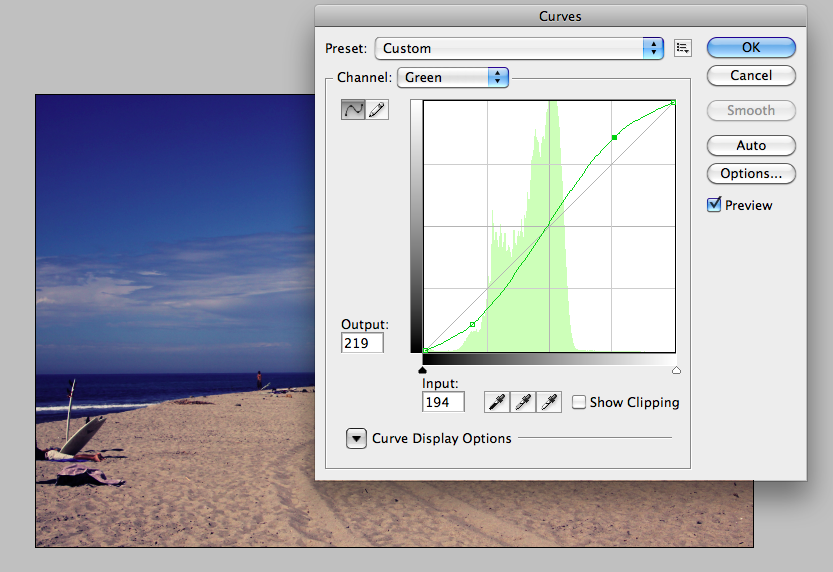
With the blue channel, we want to do the reverse – so decrease the highlights and increase the shadows (a reversed S-curve)
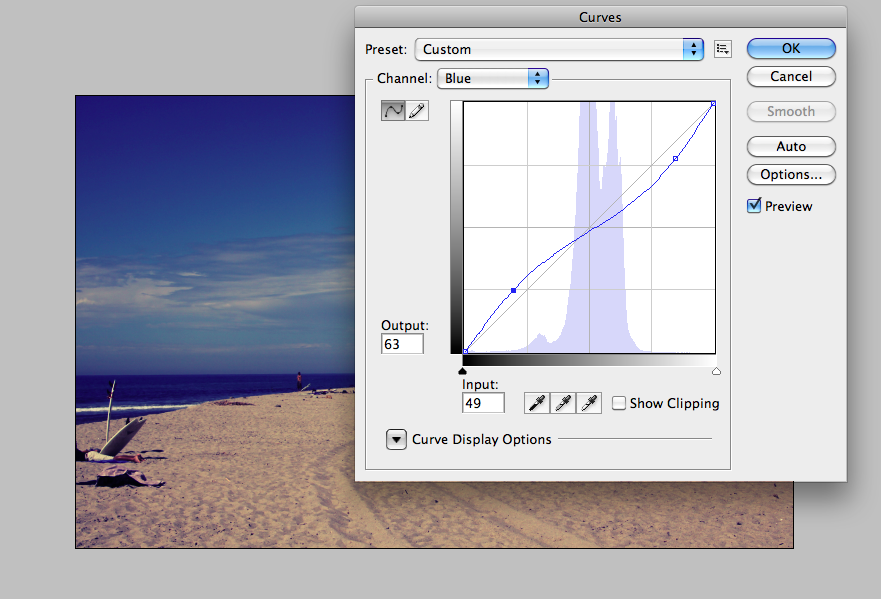
To help me remember what to increase and decrease, I would think of a strawberry. A strawberry has the colors green and red and starts with an ‘S’. Thus, those two colors follow the S-curve whilst the color blue would be reversed.
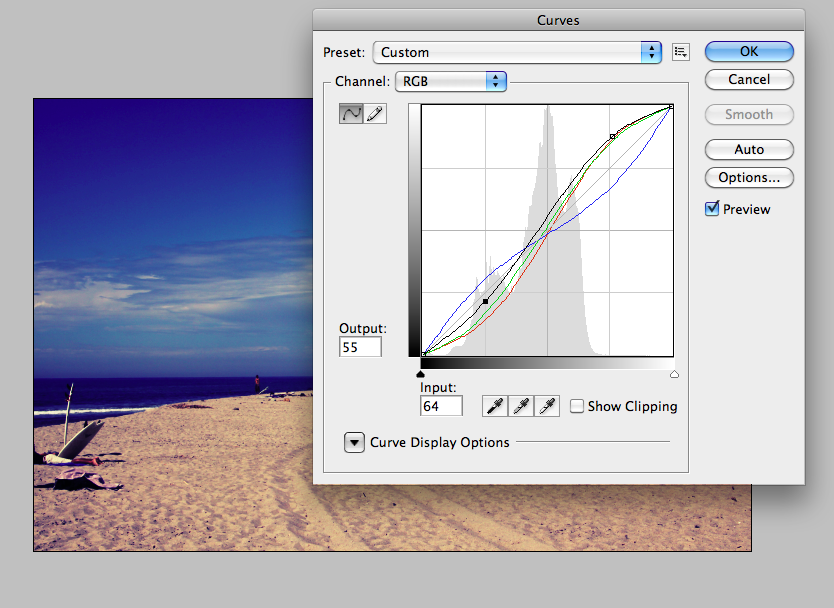
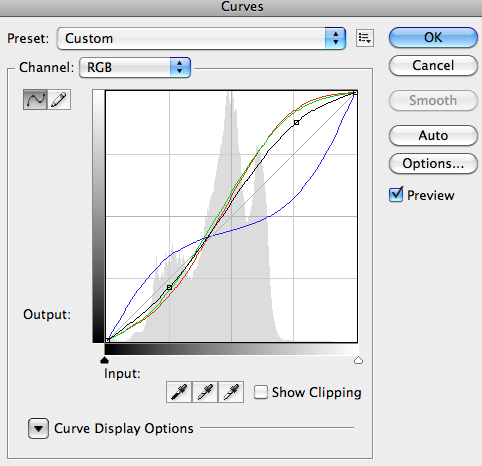
Also adjust the RGB channel if you want a bit more contrast. So increase the highlights and decrease the shadows (S-curve again). Be subtle about this, unless you’re purposely going for an over-the-top look.
A photo with more vibrant colors in minutes
Once you’re happy with the curves, you can really just leave it as it is. Or, you can go one step further by increasing the Saturation levels, just don’t over-do it. Here’s the finished picture:
As mentioned, there’s no right or wrong when it comes to applying the cross processing effect. Experiment and have fun with it! Here are some other variations I came up with:
Version 2

Version 3

Show us what you’ve come up with by posting a comment below. -
20 Amazing Painting With Light Photos
Posted: Thu, 11 Mar 2010 13:00:15 +0000
Recently we published inspirational article containing great long exposure shots. Today we wanted to go a little bit deeper and focus on painting with light trend.
Usually to paint with light you need to apply long exposure techniques, for getting the picture, combined with some sources of light (LED lights, pyrotechnics etc.) that burns trail/picture on the photography.
Here are some great light painting photos, will try to come up with tutorial on this – subscribe to Photoble feed and stay tuned.
LightFighting by lapp-pro.de

Gabriel by Dennis Calvert

Thorens TD-316 by Audiotribe

Carnival by BURИBLUE

Dance by BURИBLUE

light circles 02 by CowGummy

Ahijuna carajo con la luj mala! by El Endemoniau

Painting With Light by JRyle79

[untitled] by snowbored72

Thug teleportation by tdub303

Transcendental by Dennis Calvert

Beach Flower by CitizenLee

I Love You by czd72

Waiting to go out. by JAHook Photo

[untitled] by Kimbell

080108_2792 by pixlux

gone fishin’ by SLR_Ninja

light person 4 by steph reed

need a title by tdub303

flamingoes 3 by UnklStuart

-
ZipShot – Compact, Ultra-Light, Quick Setup Tripod
Posted: Wed, 10 Mar 2010 14:38:12 +0000
Tripods sometimes can be very uncomfortable to carry with you – they simply take much space. Also setting them up can take a while.
Just discovered this ZipShotlight weight, compact tripod that you can set-up almost instantly.
Of course it may not be as stable as regular tripods but for it works for majority of tasks you may have taking pictures. It is also great for traveling as it doesn’t take much space.
You can buy it on Amazon
Here is how it looks like and works:
-
5 Animal Photography Tips For Creative And Funny Pet Pictures
Posted: Fri, 05 Mar 2010 14:10:55 +0000
Animal photography can be really fun, especially if you are lucky enough to capture that special moment where animals express their emotions, do something crazy or just look funny.
Here are some tips that may help you to shoot more creative pictures and get more fun out of the process.
1. Look for funny facial expression
You think only humans can do the faces? No! You can’t imagine how full of emotions can be face of an animal – focus on capturing these emotions with your camera.
Oh, no – she’s BACK! by annkelliott

A Hoot by doug88888
Laughing Donkey by jaxxon

2. Funny poses
Just like with facial expressions you may get lucky and catch your pet in funny pose – make sure your camera is with you! Also if you know your pet very well you maybe know some interesting things it usually does – why not to try capture them?
What you’re laughing at? by geedorama

Yep, I Think It’s Time to go On a Diet! by njchow82 Holiday Eating!… by skipgoforth

3. Look what they are doing
Sometimes animals do funny stuff, try to be always there with you camera and I bet you will get some amazing pictures. This may take long time when you catch something but it is worth it.
Gorilla Baby Hug Party by Sloth-in-a-Box (DOaZOO)

Ring tailed lemur by floridapfe

Food Fight! by Tad 20D

4. Make them do things
You look at the pet for hours and it’s nothing interesting? You may want to take things in your own hands – try to create some interesting situation, design the scene.
Grimlock vs Munkzilla by Fanboy30

Hamster in egg – Chmurka hatched! by pyza*

Polly Babysits 2 by Woupidy

5. Dress up
Dressed up pets look really funny, especially if you think about some specific character to make. Try to express not just your fantasies – think about what character may suite to your pet best. What clothing and accessories works best? Try dresses, hats, glasses.
Funny Little Frog – Bułeczka by pyza*

Ready for Take Off by vyxle

Roxie’s New Dress by Yer Photo Xpression

Hope you find inspiration these tips – share your experience in comments below! Did you manage to capture funny shot? -
3 iPhone Camera Lenses
Posted: Mon, 01 Mar 2010 13:27:45 +0000
iPhone camera lenses can be great addition to your phone and helps you take better and more interesting pictures. Of course you can try to mount SLR lens on your phone but it takes some time and doesn’t give any guarantee you will be able to take some shots at the end.
On Amazon you can find some cool lenses that are made specially for iPhone – telescope, macro/wide and fish-eye it’s all there. Of course you will not be able to squeeze dSLR quality out of iPhone and these lenses, but I can guarantee a lot of fun experimenting.
Telescope Lens 6x ZOOM for APPLE iPhone 3G

Want some camera zoom on iPhone? Here you go – massive looking telescope lens with 6x zoom will help you to do that. It is very easy to attach as it comes together with plastic cap that you simply snap to your iPhone. I have seen this bad boy in action – it works great and have very impressive look too, you can defiantly stand out of the crowd.
Wide and Macro Lens for iPhone

This and other Digital King lenses for iPhone is very qualitative as they are manufactured with optical glass that sits in aluminium body. This particular lens is for macro photography and wide angle shots and works with iPhone 3G and 3GS. To mount this lens you need to attach a magnet first and then just snap the right lens on it.
Fish-eye Lens for iPhone

This fish-eye is from the same manufacturer as the previous lens which means great quality and same mount system. this lens will give you possibility to take 180° shots. The only downside of the lens is that it is relatively very expensive (around $80).
I hope you will me able to experience a lot of fun taking pictures with these lenses and I’m sure that there is also many other options you can choose. Here is some iPhotography tips, apps and photos for your inspiration! -
20 Beautiful Icicle Photos
Posted: Fri, 26 Feb 2010 10:46:49 +0000
The place where I live is currently the paradise of icicles. Everywhere you go you see these amazing nature formations and I thought it may be a good idea to show some great icicle pictures for inspiration, so here you go! Have some photos of icicles hidden somewhere too? Share them in comments!
Point of release by Manky Maxblack

Ice Bokeh by Clearly Ambiguous

Ice ice baby by bella lago

Melting icicle drip drops by circulating

Icicle close up by hebedesign

Icicle swan by hebedesign

El principio by Pablo Gómez Leal

Icicle Drop Abstract by James Loesch

Icicles by Muffet

Ice Captain by unifiedphoto

Icy drop by arbeer.de

Holly days on ice by BruceTurner

Icicles 1 by danmachold

Icicles at sunset by herr_hartmann

closer…. by Ben McLeod
…Icicle… by ĐāżŦ {lost – mostly absent}

Icicle by papaija2008

AUTUMNcicles…. by ViaMoi

Icicles by Emery_Way

Manipulated Icicles by wmacphail

Subscribe to:
Posts (Atom)